A hat may appear handsome from a distance, yet its pedigree reveals itself only on close inspection. Learning to read stitching, sweatbands, and inner-brim details will show whether a piece is made to last and will improve with time, helping you avoid costly mistakes.
When assessing a hat, attend to neat external stitching, a well-turned brim, a securely attached sweatband, and a carefully reinforced inner brim. Lining, taped seams, and the subtle marks of hand-blocking point to considered craft and the prospect of future repair. These are the details that reward closer inspection and indicate a piece made to last.

How to assess external stitching and brim finish on a hat
Examine the stitching: even, closely spaced stitches with uniform tension across the crown and brim, and neat backstitching at joins, indicate that stress will distribute evenly and reduce the risk of unraveling. Run a fingertip along seams to detect skipped stitches, loose threads, or puckering. Check the brim edge for a bound finish or tidy rows of topstitching; a folded or blind-stitched binding that lies flat, without visible adhesive or raw fabric, shows the edge has been mechanically secured. Such mechanical finishes help the brim keep its shape and make future repairs or re-shaping easier. These small features repay a close look.
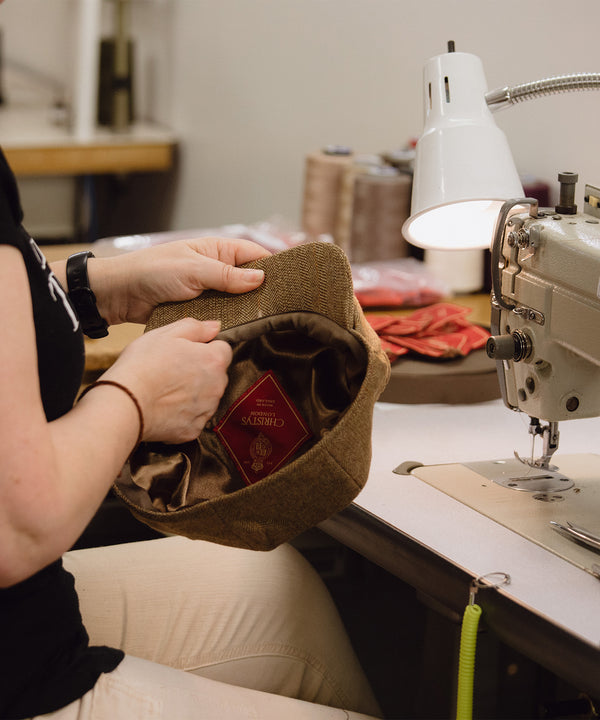
Also, check for reinforcements at likely stress points, such as small, dense bartacks or extra rows of stitching where the sweatband meets the crown, at strap attachments, and around ventilation holes. Concentrated stitching like this shows the maker anticipated strain and favoured construction that will endure. Lift the sweatband to confirm it is a folded leather or cotton band, stitched into the crown and often finished with gussets or vents for fit and airflow, rather than glued. Peer inside for a sewn-in stiffening layer of canvas or buckram, covered by a grosgrain or fabric binding with sealed stitching and no exposed staples or glue. These details help the hat hold its shape and make re-blocking or repair straightforward, and they are the sort of subtle workmanship that rewards closer inspection.

How to evaluate a hat's sweatband: material, attachment, and fit
Inspect the sweatband to determine its material and likely performance. Full-grain leather will feel supple and show a natural grain, dense, woven cotton feels structured and textured, and synthetic wicking fabrics feel smooth and slightly slick while shedding moisture. Press the band against the brow to check contact, elasticity, and recovery: a correctly sized band compresses noticeably, then springs back and sits evenly without pinching. Smell and handfeel offer further clues to longevity; a stable, dry handfeel suggests effective moisture management and a lower risk of premature failure.
Also, run a finger along the inner seam and lift the brim to check for continuous stitching, even stitch spacing, and neatly folded edges rather than visible glue, gaps, or loose threads. Gently tug the sweatband; it should remain fixed without shifting. Look for reinforced stitching or bartacks at the centre front and temple points, where strain concentrates. Examine stitch density and tension: tight, even stitches with no puckering or skipped threads indicate careful construction, and a stitched or taped liner on the inner brim helps reduce abrasion and adhesion to the crown. Folded, bound, or topstitched edges give a clean finish, make detachment less likely, and simplify repair if loosening occurs. These small details warrant attention.

Inspect inner-brim reinforcement and shaping for structure and comfort
Examine the inner brim for a core of layered canvas or buckram, often hand-blocked or reinforced with sewn-in stiffeners. This structure gives the brim a uniform curve and lasting memory. Test the shaping by gently flexing the brim along its curve; it should return evenly, without soft spots or sags. Inspect seams for even stitch length, close spacing, and neat back-tacks at joins. Pass a finger along the inside of the crown or hold a small torch to reveal any skipped stitches or loose threads, which may open under tension. These are the small details that reward closer inspection.
Lift the sweatband and inspect its material and attachment. Leather, cotton twill, or moisture-wicking fabrics that are fully stitched in and finished with folded edges indicate a serviceable installation. Look for bartacks, the short reinforced stitches, at each end, even dyeing rather than patchy wear, and an absence of glue residue where binding tape, folded hems, or piped edges protect raw seams. Topstitching should lie flat and even, with a smooth transition between brim and crown, and narrow, regular binding that follows the rim without puckering. Finally, perform a few simple longevity checks: press the crown and brim to ensure they rebound to shape; confirm the internal seams are intact so the hat can be reblocked or repaired; and note consistent wear on the sweatband. Taken together, these signs point to a hat built to be maintained and to endure.
Inspecting inner-brim reinforcement: quick checks, common faults, and simple fixes
- Flex the brim along its curve and observe the rebound: an even spring-back points to a layered canvas or buckram core with good memory, while soft spots, uneven return, or permanent sags indicate delamination or a compromised core.
- Lift the sweatband to examine material and attachment: a fully stitched-in leather, cotton twill, or moisture-wicking band with folded edges and bartacks at the ends denotes a serviceable installation; glue residue, loose tacking, or unbound raw seams suggest amateur repair and likely future failure.
- Scan seams inside the crown and under the brim for stitch quality: even stitch length, close spacing, and neat back-tacks where joins meet are signs of durable construction; skipped stitches, loose threads, or ragged joins are precursors to separation and make reblocking risky.
- Use simple maintenance and modest repairs to extend life: reblock or steam only if internal seams are intact, restitch bartacks and loose seams early, replace puckered binding, and renew an over-worn sweatband; seek a milliner for glued cores or extensive delamination.

Inspect the lining, taped seams, and interior finish
Inspect the lining for a full, smooth layer of breathable natural or technical fabric, stitched flat to the crown with no puckering. A well-set lining hides panel seams, wicks sweat, and helps the shell retain its shape. Check the panel joins for bias tape or a narrow binding that covers raw edges and is stitched down rather than glued; tidy, fully bound seams resist fraying and improve comfort. Examine the stitching for even length and tension, consistent spacing of a few millimetres, and reinforced bartacks at stress points. Lift the sweatband to see whether it is sewn through, includes a gusset or padding, and has neat joins, since these features aid moisture absorption and make sensible repairs possible. Taken together, these features indicate how workmanship and materials will affect fit, comfort, and longevity.
Also, turn the brim over to confirm a continuous binding, uniform thickness, and an internal stiffening layer such as canvas or buckram. Gently flex the brim; it should recover smoothly to its original shape. Visible glue lines, raw edges, or uneven thickness betray shortcuts, while a tidy underside and clean joins indicate attentive internal finishing. Taken together, these features give clear, practical evidence of a hat's likely durability and serviceability, beyond outward appearance alone.

How to spot hand-blocking and assess a hat's repairability
Run your fingers along the moulded curves of crown and brim, and lift the lining where possible. Subtle asymmetry and faint tool impressions reveal hand-blocking and hand-finishing more reliably than surface gloss. Inspect the stitching: even stitch length, locked thread ends, and saddle or back-stitching at stress points are signs of considered construction. Lift the sweatband to see whether seams are sewn through the brim rather than simply glued. A stitched-in leather or cotton-twill sweatband, with visible hand tacks or close stitch intervals, indicates a lining that breathes, conforms to the head, and can be removed for repair. Take note of these features; they repay close scrutiny.
Then, examine the inner brim and crown for structural reinforcements such as buckram, horsehair, or taped edges. Gently press and bend the brim to judge spring and memory, and note folded raw edges or hand-stitched bindings that protect the shape. Seek modular details, such as spare seam allowances, accessible stitch lines, and hand-tacked linings, which make re-stitching, re-blocking, or re-lining straightforward. Minimal adhesive use, visible tacking, and seams that sit accessibly rather than being buried offer practical evidence of repairability. Where stitch lines remain visible or the sweatband is removable, a skilled repairer can renew the internal structure without wholesale reconstruction.
Taken together across the previous checks, well-made hats reveal their quality in close-up details rather than outward gloss. These are the details that reward closer inspection: even, closely spaced stitching, a stitched-in sweatband with folded edges, and an internal buckram or canvas core. Together they show a hat will hold its shape, respond to reblocking, and improve with time.
To conclude, inspect the stitching, the brim finish, the lining, and the attachment points. These details reward closer inspection: even, closely spaced stitching; a neatly turned brim; a securely set lining; and reinforced attachment points signal a hat that can be maintained, repaired, and worn for many years. A short, hands-on check will make clear which hats promise long service and straightforward repair.